
Formally known as an accidental discharge, a negligent discharge describes a human failure resulting in a firearm discharging unexpectedly. I guess it was renamed when most people realized human failures rather than mechanical failures cause them. However, mechanical failures that result in a discharge, such as a safety physically failing, are probably best described by the term accidental discharge (due to mechanical failure).
I’ve had two negligent discharges in my lifetime. No one was hurt, and the guns were pointed in a safe direction, but they both scared the living hell out of me. One was an old lever-action rifle where I was improperly clearing a jam. The other was due to improper trigger finger discipline when I was just learning to shoot a semi-automatic pistol (SAP).
It is essential to realize there is even more at stake with a negligent discharge. For instance, in Arizona, the unlawful discharge of a firearm in a municipality is a felony with a mandatory prison sentence. So, even if the bullet did no damage and just scared the hell out of you, your angry neighbor may call law enforcement, and you might get even more scared after talking with your attorney.
Given the safety and legal concerns, I prioritize safety over speed and simplicity over capability regarding firearms and ordinary civilians. Furthermore, I feel that civilian defensive gun use (DGU) statistics show that you won’t be at a disadvantage with this prioritization. This background will inform the list that follows.
How To Dramatically Reduce Your Chances of a Negligent Discharge
Guiding Principle: Formal Instruction
- Take a Firearm Safety Course. For many of us, our first firearm safety course came from our father or grandfather. Then, when we applied to hunt for the first time, there was a mandatory safety course. However, the number of hunters is likely down, and the number of people who carry firearms is up. Many people may have never had formal instruction in proper firearm safety. If that is you, change that.
- Take a Private Lesson from an Instructor Who is a Weapons Expert with Your Firearm. Many training facilities offer private lessons. In Arizona, C2Tactical and Independence Training are the ones I’ve used. The benefit of this approach is an expert can break down the various safety features of your firearm. For instance, you may be surprised to learn your SAP has a magazine disconnect safety. Other ways the expert can help you is to show you how to properly clear jams with your SAP, check for a loaded chamber with your SAP (both in the day and at night), and so forth.
Guiding Principle: Simplicity over Capability
- Use a modern-day Single Action Revolver (SAR) or Double-Action Revolver (DAR). A SAR is fine if you don’t plan on carrying a concealed firearm and will use one just for home defense. Ensure your SAR has a transfer-bar safety mechanism. If you plan on carrying, there are several good modern DARs available to try.
- If you are using an older SAR or DAR that does not have a safety mechanism (e.g., the firing pin is on the hammer), you must carry with the hammer down on an empty chamber. I still load five rounds even in my modern revolvers simply because it is my ingrained habit. Five rounds are still fine based on civilian DGUs statistics.
- Some people put their pistols in their pockets with no holster, and almost everyone I know that has a fast-access safe doesn’t use a holster in the safe with a round in the chamber (you should use a holster regardless). If you will carry a gun or have one in a fast-access safe, always use a holster that protects the trigger. If you carry a SAP with a round in the chamber, your holster should cover the trigger and controls. A holster is essential, especially in stressful situations, as it guides your hands so you may grip your firearm properly and safely (see my post on fast access safes for more info).
- The most dangerous thing you can do with a SAR or a DAR, if you have manually cocked back the hammer, is to lower the hammer on a live round. Sometimes, this situation is unavoidable. Perhaps you were hunting, thought you had a shot, but no longer do. Now you have a cocked gun that you aren’t going to shoot. I think most people deal with this situation as in the western movies, one-handed. I would recommend something else. Use your offhand to go across the top strap and place your thumb between the hammer and the frame. Then, with your shooting hand, use your thumb to grasp the hammer, then press the trigger with your trigger finger. When you feel the hammer release into your hand, immediately release the trigger (for modern revolvers, this will let the transfer bar drop). Ease the hammer down with your shooting hand, gradually moving your offhand thumb until it is out of the way at the end of the cycle.
- I never liked the “traditional” way of loading an older SAR (i.e., no transfer bar safety), where you place one round in the cylinder, skip one, then load the rest. When you can’t load another round, you cock the revolver and lower the hammer on the empty chamber. I never like to cock a revolver that I’m not going to shoot. There are a couple of ways around this. One, verify the six-shot cylinder is empty, then place exactly five rounds in your hand and load them one at a time. Two, a gunsmith can modify your SAR so the cylinder will turn both ways when loading. Load normally, find the empty chamber, and reverse one, so the empty chamber is under the hammer. Three, you can designate an empty chamber – this chamber will never have a round in it. A gunsmith can dimple either side of the cylinder on the chamber that will be empty and even color the dimple a bit. You’ll want to place the dimples so that you can see them looking down from the top strap. Load normally, skipping the designated empty chamber and aligning the dimples to either side of the top strap. If you are using a DAR, there is no need for these techniques. Simply dropping the cylinder and aligning the empty chamber with the hammer is all you need to do.
- Don’t mix and match revolvers with different capacities, safety mechanisms, and loaded rounds. If you have modern revolvers, make sure all of them have a capacity of six rounds and load six rounds. If you have a mix of older and newer revolvers, make sure their capacity is six but only load five rounds in all of them.
- Some people have terrible habits with SARs and DARs. They will attempt to avoid the muzzle end of their revolver to get a glance at the end of the cylinder to see if they can see the bullets in the cylinder. That way, they know if they have a round coming up. However, if you are shooting a large caliber revolver and the cylinder moves clockwise from the shooter’s viewpoint, simply use the tip of your pinky finger to feel the top of the bullet. Not that this procedure may not work if you are shooting shorter ammo in a large revolver, such as a 45 ACP in a 45 Colt conversion.
Guess what? If you are using a revolver, you can stop reading now. You may only want to practice misfires, but misfires with a revolver are pretty easy to get around safely. In general, in the event of a misfire, I would wait a few seconds for safety reasons in case of a delayed ignition. With modern factory rounds, misfires are pretty rare once you have verified your gun likes those factory rounds. You may want to forgo the delay if you practice combat shooting with a random chamber loaded with dummy ammunition.
Guiding Principle: Safety over Speed
- If you use a SAP, carry in condition 3 (hammer down, chamber empty, loaded magazine). Remember that you’ll handle your firearm far more than you are shooting it. If speed is a priority, learn the Israeli method. If you are a law enforcement officer, SWAT, or special forces, you have different threats, and you will likely be carrying in condition 1. For ordinary civilians with standard threats, condition 3 is fine.
Guiding Principle: Sometimes Getting There is the Tough Part
- If you use a SAP, never put the hammer down on a loaded chamber unless your pistol has a de-cocking lever. With the 1911, some people would carry in condition 2 (hammer down, loaded chamber, loaded magazine). Putting the 1911 in condition 2 from condition 0 is the problem as that is very dangerous because 1911s do not have de-cocking levers. It will hurt at some point, so don’t do it.
Guiding Principle: Don’t Put Your Fingers Where They Don’t Belong
- Trigger finger discipline is removing your trigger finger from the trigger guard when you don’t want to shoot. It sounds simple, and in most cases, it is. However, people can run into problems with operating controls or the slide. If there is any resistance to those controls or the slide, you’ll instinctively want to hold the handgun more securely. In short, your trigger finger will want to drop and try to grasp the handgun better. Unfortunately, that often involves your trigger finger getting way too close to the trigger. The easiest way to see if this is happening to you is to video yourself on a typical shooting day (you may want to drive out to the country and find a safe place to shoot instead of the range for this process). Finally, go back and watch what your trigger finger did during reloads, engaging the manual safety or racking the slide. This process will help you correct any mistakes. For me, I went to always using two hands, and my offhand works all the controls. While I can shoot one-handed fine, I rarely do and prefer using two hands for control and safety. Two hands should be fine for civilians.
- Clearing Jams. Jams are unexpected; because they are unexpected, people often do strange things that are not part of good gun safety. Furthermore, to manipulate the slide, you need a good grip on the pistol, which means the grip safety is depressed (deactivated). Also, the manual safety is disengaged so the slide can be manipulated. If the slide unexpectedly releases and either picks up a round or a round is in the chamber, and your trigger finger discipline is bad, you’ll have a negligent discharge. You’ll need to practice this process, and I’ll try and give you an idea of what to do. You must be a handloader or know someone who is a handloader who is willing to help you.
- Assuming you practice with one magazine in the pistol and two magazines in a holder, you’ll want to create several dummy cases based on the number of rounds you load in the magazine. For instance, if you carry 14 rounds in the magazine, you’ll want to create about four dummy rounds per magazine, or 12 rounds total.
- Your dummy round’s foundation is a resized deprimed case. You’ll want to use a glue gun and fill the primer pocket with glue. Once it dries, shave the primer flat with a box cutter. The dried glue will protect your firing pin.
- Misfires: The first dummy round creation simulates a misfire. Simply seat one of your customarily used bullets in your empty dummy case so that it feeds fine.
- Failure to Feed: The second dummy round requires some trial and error. You want to find a bullet that will jam while feeding. In many cases, bullets with a unique ogive may be the ones to try. Once you find one, seat it in your empty dummy case.
- Stovepipe: This round will not use a dummy case. It will simply be a light load that almost functions the slide, but the empty case gets stuck. This load will require some experimentation. You will always want to stay within the powder guidelines of the load as too light of loads can have erratic pressures. You may need to move to a slightly heavier recoil spring as long as this spring still functions with your standard ammunition.To make things more interesting, modify three magazines, so they do not hold open the slide.
- Needless to say, you’ll want to store these rounds and magazines entirely and separately from your other gear. A big sign on it saying “Use Only For Jams – DO NOT USE NORMALLY” would be recommended.
- You’ll want to do your regular shooting practice, but video yourself doing this drill. You may want to drive to the country and find a safe place to shoot for this drill. Concentrate on safety first; you can work on speed later. Review your video to see if you have any bad habits. Okay, you’ll need a friend or spouse for the following process. They will go through the following procedure, where they will load the magazines while you are in another room.
- Get two six-sided casino dice.Roll the dice. If snake eyes come up, that magazine used will be one that doesn’t hold back the slide when empty. For any other values, use a standard magazine.
- For each round in the magazine, roll the dice. For example, rolling snake eyes indicates that you would use a misfire round. For a 2:2, use a failure to feed round. For a 3:3, use a stovepipe round. For any other combination, use a standard round.
- Repeat until all three magazines are full. Next, your friend or spouse will place a magazine in your firearm and your magazine holder. This way, you will not know what the first round is.
- With this process, a 1/36 chance the magazine has something wrong with it. Each round has a 3/36 or 1/12 chance that something is wrong with it. This rate should get you enough regular rounds to make the failure unpredictable. As you get better, you can add another 6-sided die and make the process 1:1:1, 2:2:2, or 3:3:3 so that the failures are much rarer. Also, you can say: 1:1:Odd, 2:2:Even, or 3:3:Odd to get a little more failures than the three dice.
You can see why SAPs require a lot more work to use safely. The “problem” is that modern-day SAPs are very reliable, and operators don’t get much practice when things go wrong! As I said before, when things go wrong unexpectedly, people seem to do some strange things that go against common sense gun safety.
Guiding Principle: The Grip Safety is Your Friend
Okay. I will say something that will make you say, “No S**T, Sherlock!” Many negligent discharges happen when you are never planning to shoot your firearm. Well, DUH. What I mean by that are times like cleaning your gun. When you decide to clean your gun, you are starting a process with the firearm, and you never plan on shooting it during the entirety of that process. Another process like this is when you do a function check of your firearm before holstering it for the day.
There are two techniques I will share to drastically reduce your chances of a negligent discharge in these situations. However, they require a grip safety. If your firearm does not have one, these tips won’t help you.
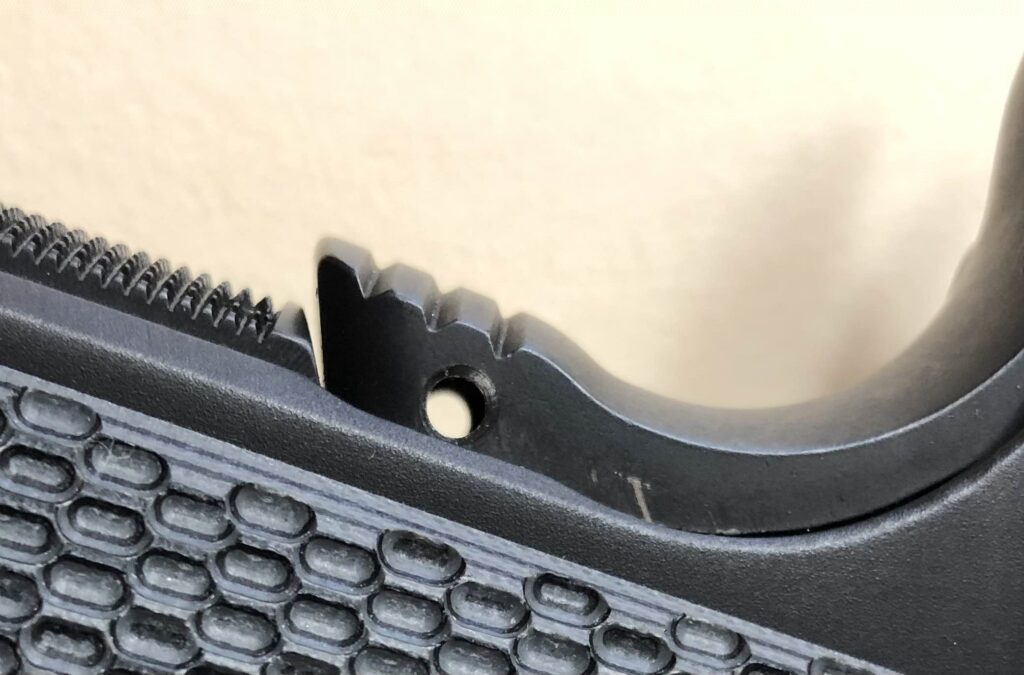
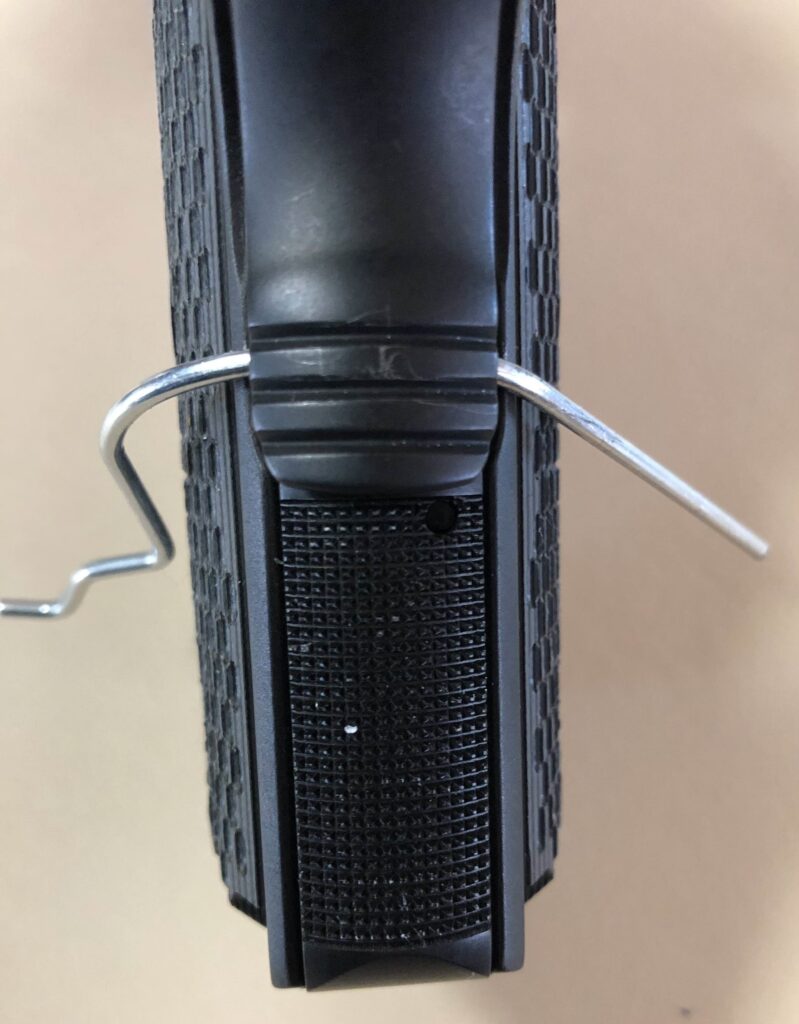
- Modify your grip safety. I have a gunsmith drill a precise hole in my grip safety. The purpose is to insert a pin and block the safety from depressing. When I’m going to perform a task where I will not be shooting the firearm, I first place a small hitch pin through it. This pin blocks the grip safety and prevents it from being deactivated. The pin is obvious, so it isn’t like you will accidentally leave it in the gun. Importantly, the pin doesn’t replace the safe handling of the firearm. See the photos.
- Gun Cleaning. The first thing I do is put in this pin. The last thing I do is take it out.
- Function Check. This process is one I would do if I were going to carry a concealed gun for the day. Also, there is an additional tip for those who carry in condition 3.
- Open the fast access safe. (NOTE: if you are storing firearms in a regular safe, they should be unloaded, and the ammunition stored in a different safe).
- Insert grip safety pin.
- Remove magazine.Because I carry in condition 3, I always mark the first bullet of the magazine with a dot using a sharpie. When doing this function check, I ensure the magazine’s first bullet has a dot. If there is no dot, this tells me someone has accessed my firearm.
- I leave the full magazine in the fast-access safe.
- Remove the gun from the holster and keep it pointed in a safe direction.
- Check the loaded chamber indicator (if you have one).Rack back the slide and lock back. Once again, verify no round is in the chamber.
- Move to a work area that contains no loaded ammunition.
- Optional: place the firearm on magwell vice; the firearm should be pointed in a safe direction.
- I use a small bore light to ensure the barrel is clear and the bolt face has no apparent problems.
- At this point, you have verified the operation of the mag release and slide stop.
- Remove from mag vice if you used one. Keep the gun pointed in a safe direction.
- Ease slide forward.
- Load in an empty magazine.
- Rack slide and verify slide stops.
- Remove the magazine, and ease the slide forward.
- Hold the hammer with your offhand and attempt to fire the unloaded firearm normally. This process ensures the grip safety pin is doing its job. If the firearm can’t be fired, it is doing its job.
- Remove the grip safety pin.
- Proceed with your routine function check (verify grip safety, manual safety, and so forth).
The last thing I’m going to discuss is the press check. It is unfortunate how much ink has been spilled on this topic. It would be much easier if every SAP had a loaded chamber indicator that could be seen and felt. The latter is crucial in darkness. Also, it is challenging to add this functionality to a firearm that does not have it. In short, a recessed area should be designed for the firearm. That area has a loaded chamber indicator that can be visually seen and physically felt. The recessed area is required, so this indicator will not snag on anything. This design would prevent the need for press checks.
- Press Check #1. One of the more dangerous press checks you can do is to be holding your gun one-handed, insert your offhand thumb into the trigger guard, wrap your offhand fingers around the rail in front of the chamber, and then use your thumb to press against the trigger guard, using it as leverage to pull back the slide just enough to see or feel (with your shooting hand) whether there is a round in the chamber. This process will get you a negligent discharge at some point. Why? The grip safety is depressed, and your manual safety is off (so you can manipulate the slide). It doesn’t take much for your thumb to push against the trigger (especially if you have a big thumb or have gloves). Before beginning this press check, you can make this process safer by removing your shooting hand off the grip safety, just by lowering it and holding on to the bottom of the grip. If your gun has no grip safety, do not do a press check like this one. This press check is also difficult to accomplish on smaller handguns as you’ll likely have a finger close to or blocking the muzzle because there is not enough slide to grasp. A negligent discharge happening at this point may cost you a portion of your offhand.
- Press Check #2. This press check involves hooking your thumb on the top of the grip safety and using your fingers to grip the slide behind the chamber. The leverage from your thumb allows the slide to be pulled back, revealing whether a round is in the chamber. Because the top of the grip safety is used, it may not be depressed. In any case, there is no thumb or finger in the trigger guard. As a result, this press check is much safer to perform. You can see this stylishly done in the second John Wick movie.